 Official Government Website
Training Guides & Videos
DHR Training Guides
Training Videos
Full Access Training: Learn the recruitment process from start to finish in this comprehensive three-part training video series.
- Session #1: Create a requisition, recruiting file, job announcement with supplemental questions, and post the job.
- Session #2: Build the scoring plan and evaluation steps.
- Session #3: Process applications, assign to SME, refer passing applicants, code a referred list, move your selected candidate into a “Hired” status, and close out your recruitment.
Limited Access Training: This training video is for agencies that do not currently post their own job announcements or process their own applications.

Recruitment Resources
- Job Posting
- Job Posting Checklist [checklist of items to look for before publishing a job posting]
- Job Posting Template [template for creating a posting a job]
- Subject Matter Experts (SME)
- SME Expectations [overview of the SME requirements]
- How to Find a SME [tips for finding a SME]
- SME Review [step-by-step technical guide for SMEs]
- Notices
- Set Up a Notice Template [instructions for how to create notice templates from the Online Hiring System to applicants on referred list]
- Send Notices [how to send notices to candidates from the online hiring center]
- Filters
- Advanced Filter Options [instructions for how to set up and use advanced filters]
[INSIGHT] Quick Recruitment “How To” References
Close a failed search
Close a failed search:
Start in the Insight side of the system.
- Update the referred list disposition and archive list
- Hover over the Lists dropdown and select “Referred”
- Type the requisition number into the search box and select the magnifying glass icon
- If you do not see the correct result, update the selection in the “Active” dropdown on the left side of the screen to “All” and search for the requisition number again
- In the list column, select “View”
- On the Referred Candidates page, look at the disposition in the Status column to make sure no applicants are still in an “Interview” status
- Applicants should be in a Referred or Rejected status
- Select the back arrow in your browser to return to the Referred Lists page
- In the Action column on the right side of your screen, select the Edit (pencil) icon
- On the Edit Referred List page, update the Display Candidate Status to read as “Position Cancelled”
- Select “Save”
- On the Referred Lists page, in the Action column, select the Archive (bankers box) icon
- Select “Ok” on the “Are you sure…” popup to move this list into an Archived status
- Update the eligible list disposition and archive list
- In the Insight side of NEOGOV, hover over the Lists dropdown and select “Eligible”
- Type the requisition number into the search box and select the magnifying glass icon
- If you do not see the correct result, update the selection in the “Active” dropdown on the left side of the screen to “All” and search for the requisition number again
- In the Action column on the right side of your screen, select the Edit (pencil) icon
- On the Eligible List Detail page, update the Display Candidate Status to read as “Position Cancelled”
- In the Days Candidate Eligible field, enter “90”
- Scroll to the bottom of the page and select “Save”
- On the Eligible Lists page, in the Action column, select the Archive (bankers box) icon
- Select “Ok” on the “Are you sure…” popup to move this list into an Archived status
- Update the requisition status to “Cancelled”
- In the Insight side of NEOGOV, hover over the Jobs dropdown and select “Requisitions”
- Search by entering the requisition number in the Req. # field
- Use the scroll bar to view the Actions column on the right side of the screen
- In the Actions column, select the Authorize (stamp) icon
- Update the Status dropdown from “Open” to “Cancelled”
- In the comments section, leave a comment that states “All candidates rejected”
- Select “Save”
Set up subject matter expert (SME) grading criteria (“Expert Review” evaluation steps)
Set up subject matter expert (SME) grading criteria (“Expert Review” evaluation steps):
Start in the Insight side of the system.
- Hover over the Jobs dropdown and select “Recruiting Files”
- Enter the job number in the “Exam Number” field
- Select the name of the position in the Recruiting File field
- (Once I am in the recruiting file, I like to open the job posting in a new window and select “Supplemental Questions” so I can easily review them while I am building my evaluation step)
- On the Recruiting file, next to the Evaluation Step heading, select “Add Step”
- Make or enter these selections:
- Step Type: Rating Matrix
- Step Name: Expert Review
- Display Candidate Status As: Expert Review
- Applicant Status: Show This Step
- Select the checkboxes next to these three items:
- Show step pass/fail
- Show step score
- Show step disposition
- Ignore the comments box
- Cumulative Score: select “Show cumulative score”
- Prerequisite Steps: Leave any selections here alone
- Rating Method: Numeric Rating Scale
- Rating Scale Maximum Default: 100
- Calculate Final Score Based On: Percentage Score
- Final Score Weight: 100 if there are only SME-reviewed exam questions
- This should be a split between the total of the Auto Scored and Expert Review Evaluation Steps – if both steps are present, neither should be 100 %.
- Calculated Decimal Score Places: 2
- Passing Score Percentage: 1
- Select Raters: Enter the name of your SME or use the magnifying glass icon to search for them
- If the SME you will be using is not listed, look in the users library to ensure they have SME permissions set up or create a NEOGOV account for them with SME permissions
- Rating Criteria: Enter the question number
- I also like to include what type of question it is in this field:
- For MQs, I like to label them as: MQ1
- For MQ Specialty Areas, I like to label them as: MQ2 – Specialty
- For Extra Credit, I like to label them as Q3 – Extra credit
- Description
- In this field, you must include:
- The question text
- The grading criteria
- I also like to add this note at the top of the first question: “SME – if applicant fails an MQ question, score all questions 0 and leave a note indicating which minimum qualification was failed and why.”
- I like to also remind SMEs to zero out all questions on failing applicants by adding “; score all questions 0 and leave a note” at the end of the 0 – criteria for MQ questions
- In this field, you must include:
- Rating Scale Maximum: 100
- Weight: the total weight for all SME-reviewed questions needs to equal 100 – I enter whatever values are needed to make that happen.
- I usually weight extra credit questions about ¼-1/3 as much as MQs or MQ Specialties so the scores do not get terribly off balance.
- Select “Add Rating Criteria” to add another question
- When all questions and grading criteria are entered, select “Save”
- I also like to include what type of question it is in this field:
- When all evaluation steps are complete, follow the ‘NEOGOV INSIGHT – assign applications to SME’ steps to assign the exams to the SME for scoring
Set up custom notice template
Set up custom notice template:
This action can be performed by agency users with Insight access or DHR staff.
To set up your own notice templates to send from the Insight side of NEOGOV, start in the Insight side of NEOGOV.
- In the top, right-hand corner of the screen, select “Library”
- On the Library page, select “Notice Templates”
- At the top of the screen, select “Add New Template”
- Enter the template name
- The Description section is internal to Insight users at your agency/DHR staff
- Category – leave “Candidate” selected
- Subject: This is what applicants will see in the subject line of the email they receive
- Inactivation reason – select relevant status (ex: “Does not meet minimum requirements” for applicants that do not meet MQs)
- Template: Add your message text here. Scroll down and copy/paste text from the merge fields to have information automatically populate (I like to copy big chunks from the Example Template to save time)
- You can use the “Preview” button to review how your announcement will appear of applicants
Be sure to “Save” before you exit
Process applicants and pull a referred list (auto-scored, no SME review recruitments)
Process applicants and pull a referred list (auto-scored, no SME review recruitments):
Start in the Insight side of the system.
- Hover over the Jobs dropdown and select “Recruiting Files”
- In the Exam # column, search for the requisition number
- In the Recruiting File column, click on the name of the job
- On the Recruiting File Detail page, to the right side of the ‘Evaluation Steps’ heading, select “View Applicants by Step”
- Click on the Select Action’ dropdown on the bottom of the page and select “Change Disposition”
- On the Select Candidates dropdown, select “All”
- Click the red “Go” button
- On the Candidate Disposition page, update the ‘Pass/Fail’ step selection to “Passed”
- Ignore the Inactivation Reason dropdown
- Select the checkbox next to “Advance passing candidates automatically”
- Select “Save”
- Select the plus sign icon next to Step 2: Auto Scored
- Your passing and failing applicants should display in the Disposition column
- I usually spot check one or two failing applicants to ensure I can identify an MQ they failed on. If they failed on an Extra Credit question, it is set up wrong.
- You can review the applicant responses by clicking on their names OR
- Select “View Recruiting File” above the evaluation steps
- In Step 2, select “View Results”
- This will show a breakdown of candidates passed and candidates failed
- In the Candidates Failed section, go to the Details column and select “View” – this will show you which question was failed
- To return to your Recruiting File, select the “Back” button in your browser
- Select “Auto Scored” in the Evaluation Step column to return to your passing and failing applicants in Evaluation Step 2
- If every candidate fails, or the percentages seem unusual, there is probably an issue with the scoring plan or evaluation steps setup
- I usually spot check one or two failing applicants to ensure I can identify an MQ they failed on. If they failed on an Extra Credit question, it is set up wrong.
- In the Select Action dropdown, select “Place on eligible list”
- In the Select Candidates dropdown, select “Passing”
- Select the red “Go” button
- On the Assign Eligible Candidates page, select “Assign to List”
- In Evaluation Step 2, only failing applicants should display
- If there are no failing applicants, select “Eligible List(s)” at the bottom of the page to be taken to your eligible list
- In the Select Action dropdown, select “Email Notify”
- In the Select Candidates dropdown, select “Failing”
- Select the red “Go” button
- On the Email Notifications page, in the Select Template dropdown, scroll down and select “Statewide Minimum Qualification Notice”
- Select “Generate Notices” – this will generate a preview of your notices
- Select “Send”
- In the “Emails sent successfully” popup box, select ”OK”
- At the bottom of the page, select “Eligible Lists” to be taken to your Eligible List
- Your passing and failing applicants should display in the Disposition column
- On the Eligible Lists page, in the List column, select “Default List”
- On the Eligible Candidates page, your Eligible List will display
- In the Select Action dropdown, select “Send Email Notification”
- In the Select Candidates dropdown, select “All”
- Select the red “Go” button
- On the Send Email Notifications – Generate Page, in the Select Template dropdown, choose “Statewide Application Total Score Notice”
- Select “Generate Notices” – this will generate a preview of the notifications that should contain the applicants’ exam scores
- Select “Send”
- In the “Emails sent successfully” popup box, select ”OK”
- On the Eligible Candidates page, in the Select Action dropdown, select “Refer”
- If there 25 or fewer passing applicants, in the Select Candidates dropdown, select “All”
- If there are more than 25 passing applicants, manually check the boxes next to the top 25 applicants and those who tie for 25th place
- In this instance, in the Select Candidates dropdown, you will choose “Selected Candidates”
- Under the “Select Requisitions” heading, check the box next to the requisition for this recruitment
- Skim the Veterans Status column and make a mental note if any DD veteran candidates are present
- Select the red “Go” button
- If there 25 or fewer passing applicants, in the Select Candidates dropdown, select “All”
- On the Refer Eligible Candidates page, leave a comment in the comment box if there are any DD veterans on the list
- DD veteran candidates must be offered an interview
- Select “Refer”
- Your list has been created! To review it, search for the requisition number on the “Referred Lists” page
- On the Referred Lists page, in the List column, select “View”
Process applications without applying any scoring
Process applications without applying any scoring:
This can be used when applications are received in NEOGOV, but there are no exam question for applicants to respond to, or in instances when the exam questions are informational, and no auto-scoring/SME grades will be applied.
This process cannot be used for classified positions and is most commonly used for non-classified or public health district recruitments.
- Start in the Insight side of the system.
- Hover over the Jobs dropdown and select “Recruiting Files”
- On the Recruiting Files page, in the Exam # field, search for the job # of the recruitment you would like to process applicants for
- When you find it, select the job title link listed in the in the Recruiting File section
- On your Recruiting File Detail page, in the Evaluation Steps section, select “View Applicants by Step”
- Using the Select Action dropdown at the bottom of the page, select “Change Disposition”
- Using the Select Candidates dropdown at the bottom of the page, select “All”
- Select “Go”
- On your Candidate Disposition page, make the following selections:
- Pass/Fail Step: Passed
- Note: this is not the applicant “passing” the exam – the application just need to be placed into a “passed status” before it can progress through any remaining steps.
- Inactivation Reason: (ignore this dropdown – there is an asterisk next to this section as if it is required, but that only applied if you choose “Fail” on the previous selection)
- Comments: (leave blank)
- At the bottom of the page, select “Save”
- Pass/Fail Step: Passed
- On the View Applicants by Step page, use the Select Action dropdown at the bottom of the page, select “Place on Eligible List”
- Using the Select Candidates dropdown at the bottom of the page, select “All”
- Select “Go”
- On the Assign Eligible Candidates page, select “Assign to List”
- On the View Applicants by Step page, select “Eligible Lists”
- On the Eligible Lists page, select “Default List”
- If you would like to send your applicants a notice that their applications have been sent to the hiring manager for review, follow these steps:
- Using the Select Action dropdown, select “Send Email Notification”
- Using the Select Candidates dropdown, select “All”
- Select “Go”
- Use the Select Template dropdown to choose an notification template to send
- The “Public Health District – Application Sent to Hiring Manager” lets applicants know their application has been advanced to the hiring manager for review. You are not required to send this notice, but the option is there if you would like.
- Select “Generate Notices”
- On the Send Email Notifications – Preview Page, you will see a preview of the notifications. If they look good to go, select “Send.”
- On the Emails sent successfully popup, select “Ok.”
- If you would like to send your applicants a notice that their applications have been sent to the hiring manager for review, follow these steps:
- On the Eligible Candidates page, use the Select Action dropdown to choose “Refer”
- On the Select Candidates dropdown, select “All Candidates”
- Select the specific requisition you wish to refer them to
- On the Refer Eligible Candidates page, select “Refer”
- Note: If there were any DD veteran candidates on your eligible list, I strongly recommend leaving a note in the “Comments” box on the Refer Eligible Candidates page letting your hiring manager know that DD veteran candidates MUST be offered an interview. This is still required for non-classified and health district recruitments.
- Your hiring list has been shared with the hiring manager! You can return to OHC to view your referred list, or to see it in Insight, follow these steps:
- On the Referred Lists page, search by job number to find your list
- On the Referred Lists page, select “View” in the List column to view your list
Process applications after SME review
Process applications after SME review:
Start in the Insight side of the system.
- Hover over the Jobs dropdown and select “Recruiting Files”
- In the Exam # column, search for the requisition number
- In the Recruiting File column, click on the name of the job
- On the Recruiting File Detail page, to the right side of the ‘Evaluation Steps’ heading, select “View Applicants by Step”
- Click on the plus sign dropdown next to the ‘Expert Review’ evaluation step
- In the Disposition column, your passing and failing applicants should display
- For failing applicants, click on the “Fail” in the Disposition column to review the SME comments
- Make sure the SME zeroed out applicants who did not pass the exam – if the applicant failed an MQ, but is still showing as passing, select the “Fail” button (thumbs down icon) to the left side of the screen
- For disposition reason, select “Does not meet minimum qualifications”
- Make sure the SME failed applicants on an MQ and left a comment indicating which specific MQ they did not meet and why
- If the SME did not leave comments or they are not specific, ask them to go back in and fix them
- Make sure the SME zeroed out applicants who did not pass the exam – if the applicant failed an MQ, but is still showing as passing, select the “Fail” button (thumbs down icon) to the left side of the screen
- In the Select Action dropdown, select “Place on eligible list”
- In the Select Candidates dropdown, select “Passing”
- Select the red “Go” button
- On the Assign Eligible Candidates page, select “Assign to List”
- In the Expert Review evaluation step, only failing applicants should display
- If there are no failing applicants, select “Eligible List(s)” at the bottom of the page to be taken to your eligible list
- In the Select Action dropdown, select “Email Notify”
- In the Select Candidates dropdown, select “Failing”
- Select the red “Go” button
- On the Email Notifications page, in the Select Template dropdown, scroll down and select “Statewide Minimum Qualification Notice”
- Select “Generate Notices” – this will generate a preview of your notices
- Select “Send”
- In the “Emails sent successfully” popup box, select ”OK”
- At the bottom of the page, select “Eligible Lists” to be taken to your Eligible List
- On the Eligible Lists page, in the List column, select “Default List”
- On the Eligible Candidates page, your Eligible List will display
- In the Select Action dropdown, select “Send Email Notification”
- In the Select Candidates dropdown, select “All”
- Select the red “Go” button
- On the Send Email Notifications – Generate Page, in the Select Template dropdown, choose “Statewide Application Total Score Notice”
- Select “Generate Notices” – this will generate a preview of the notifications that should contain the applicants’ exam scores
- Select “Send”
- In the “Emails sent successfully” popup box, select ”OK”
- On the Eligible Candidates page, in the Select Action dropdown, select “Refer”
- If there 25 or fewer passing applicants, in the Select Candidates dropdown, select “All”
- If there are more than 25 passing applicants, manually check the boxes next to the top 25 applicants and those who tie for 25th place
- In this instance, in the Select Candidates dropdown, you will choose “Selected Candidates”
- Under the “Select Requisitions” heading, check the box next to the requisition for this recruitment
- Skim the Veterans Status column and make a mental note if any DD veteran candidates are present
- Select the red “Go” button
- If there 25 or fewer passing applicants, in the Select Candidates dropdown, select “All”
- On the Refer Eligible Candidates page, leave a comment in the comment box if there are any DD veterans on the list
- DD veteran candidates must be offered an interview
- Your list has been created! To review it, search for the requisition number on the “Referred Lists” page
- On the Referred Lists page, in the List column, select “View”
Add point values to Yes/No questions
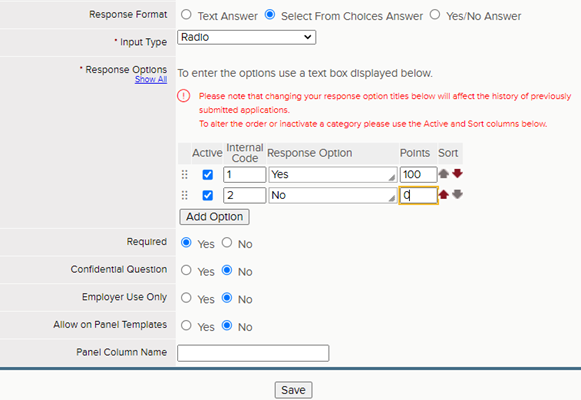
Add points values to Yes/No questions:
Use these instructions to update questions with the Response Format set to Yes/No, so points can be updates.
On your Supplemental Questions page, please select the Edit (pencil) icon in the action column next to these questions and make the following updates:
- Change the Response Format from Yes/No Answer to “Select from choices Answer”
- Leave the Input Type selection as “Radio”
- Select the “Add Option” button twice
- Complete the remaining fields to look like this:
Create a task
Create a task:
Start in the Insight side of the system.
- In the top, left-hand corner, hover over the Jobs dropdown and select “Recruiting Files”
- In the Exam number search box, enter the requisition/job number
- In the Recruiting File column, select the name of the position you are recruiting for
- On the Recruiting File Detail page, scroll down to the “Tasks” heading
- Next to the Tasks heading, select “Add new”
- Assigned to: update this field to “Recruitment, DHR”
- Subject: let us know what action is needed
- Status: Defaults to “Not started” – you can leave this selection or update if appropriate
- Priority/Due Date: You are welcome to update the “Priority” and “Due Date” fields
- Keep in mind that we must respond to recruiting requests in the order they are received. Although we try to prioritize recruitments that are set to “High” priority, we cannot always guarantee they will be posted by the date submitted in the “Due Date” box.
- Send email – leave this checkbox selected (this generates an automatic email that notifies our team about the task)
- Comments: include any other relevant information (posting dates, areas of concern, questions, etc.)
- Select “Save”
Set up scoring plan and evaluation steps for a completely auto-scored exam
Set up scoring plan and evaluation steps for a completely auto-scored exam:
Start in the Insight side of the system.
- Hover over the Jobs dropdown and select “Postings”
- On the Job Postings page, update the Current Jobs dropdown to “All jobs”
- In the Job # column, enter the job number
- In the Job Title column, select the job title
- On the Detailed Job Posting Page, select “Supplemental Questions”
- On the Supplemental Questions Page, select “Scoring Plan”
- I usually open this in another window and move it to my second monitor so I can refer to the questions while I build my scoring plan
- On the Scoring Plan page, select “Add New Scoring Factor”
- For Factor Title, enter “Auto Scored”
- For Type, select “Pass/Fail”
- For Pass Required, Select “Yes”
- In the Factor Questions Section, select the checkbox next to every single question that will be auto-scored (regardless of if they are MQ, MQ Specialty, or Extra Credit)
- Ignore the comment box
- At the bottom of the page, select “Save”
- On the Scoring plan page, in Scoring Factor 1 – Auto Scored, select the “View/Add Cases” link under the Case column
- Select “Add New Factor Case”
- For Case Title, enter “Correct Answers”
- Select “Save”
- In the Action column, select “Edit”
- For every auto scored question, select “Add condition”
- If is it a Yes/No MQ or MQ Specialty question, make the following selections:
- Correct Options: “Exact”
- Select the Checkbox next to “Yes” (or the correct answer)
- If it is an MQ or MQ Specialty question with more than one correct option, make the following selections:
- Correct Options: “1+”
- Select the Checkbox next to all of the correct answers
- Leave the Checkbox next to the incorrect answer unselected
- If it is any type Extra Credit question, make the following selections:
- Correct Options: “1+”
- Select the Checkbox next all options
- Once you have added the conditions for every auto-scored question, select “Save” at the bottom of the page
- If is it a Yes/No MQ or MQ Specialty question, make the following selections:
- On the Scoring Case page, select “Scoring Factors”
- On the Scoring Plan page, select “Add New Scoring Factor”
- For Factor Title enter “Points”
- For Type, enter “Scored”
- For Score Points From, enter “Supplemental Questions”
- In the Factor Questions Section, select the checkbox next to every single question that will be auto-scored (regardless of if they are MQ, MQ Specialty, or Extra Credit)
- Ignore both the Formula and Comment boxes
- At the bottom of the page, select “Save”
- From the Scoring Plan page, select “View Supplemental Questions”
- Select the “Edit” button next to each question to ensure the point values are appropriate and count the total number of points possible for each question as you do
- Points should be set up as:
- Pass/Fail MQ or MQ Specialty: 0/100
- Tiered MQ or MQ Specialty: 0/70/85/100
- Pass/Fail Extra Credit: 0/25
- Tiered Extra Credit: 0/15/20/25
- Save if any changes are made or select the “back” button to return to your list of supplemental questions if no changes are needed
- Points should be set up as:
- From the Supplemental Questions page, select the job title in red at the top of the page
- From the Add/Edit Job Posting page, select the link to the recruiting file next to the “Recruiting File” heading
- On the recruiting file, next to the Evaluation Steps heading, select “Add Step”
- Step type: Supplemental Questionnaire
- Step Name: Auto Scored
- Display Candidate Status As: Auto Scored
- Evaluate on: Scored
- Ignore “auto-send notices to failing applicants”
- Applicant Status: Show this step
- Select the checkboxes next to these three items:
- Show step pass/fail
- Show step score
- Show step disposition
- Ignore the comments box
- Cumulative score: select “Show cumulative score”
- Calculate final score based on: Percentage Score
- Final Score Weight: enter 100.00
- Calculated Score Decimal Placed: leave as the default 2
- Passing score percentage: 0
- Max raw score: enter in the total number of points possible if applicants got the maximum score on every exam question
- Select Save
Your scoring plan is set up and you can now process applications and pull a referred list
Attach a requisition to a recruiting file
Attach a requisition to a recruiting file:
Start in the Insight side of the system.
- In the top left corner, hover over the Jobs dropdown and select “Requisitions”
- Search in the Re. # field for the requisition number
- After you locate your requisition, select the “Authorize” (stamp) icon in the Actions heading on the right side of the screen
- If the requisition is not already in an “Open” status, update the Status section from “Authorized” to “Open”
- In the Assigned To field, enter “HR person responsible”
- In the Existing Recruiting File field, search for the Exam # listed on your recruiting file
- Select your recruiting file when it appears in the pop-up box
- Select “Save”
Assign applications to SME (no auto-scored questions)
Assign applications to SME (no auto-scored questions):
**If there are no auto-scored questions, follow these steps.**
Start in the Insight side of the system.
- Hover over the Jobs dropdown and select “Recruiting Files”
- In the Exam # column, search for the requisition number
- In the Recruiting File column, click on the name of the job
- On the Recruiting File Detail page, to the right side of the ‘Evaluation Steps’ heading, select “View Applicants by Step”
- Click on the Select Action’ dropdown on the bottom of the page and select “Change Disposition”
- On the Select Candidates dropdown, select “All”
- Click the red “Go” button
- On the Candidate Disposition page, update the ‘Pass/Fail’ step selection to “Passed”
- Ignore the Inactivation Reason dropdown
- Select the checkbox next to “Advance passing candidates automatically”
- Select “Save”
- Select the plus sign icon next to evaluation Step 2: Auto Scored
- All applicants should display in the Disposition column
- In the Select Action dropdown, select “SME Review”
- In the Select Candidates dropdown, choose “All”
- Select the red “Go” button
- At the top of the page, in the Assign to SMEs box, select the name of your SME
- If you are using more than one SME assign half of the applicants to one SME and half of the applicants to the other; if you assign all of the applicants to both, NEOGOV will allow both SMEs to grade the exams and average the scores together
- Select “Submit” at the bottom of the page
- The page will refresh and take you back to evaluation Step 2: Auto Scored – a doc should display in the SME column, signifying that applicant has been assigned
- Send an email to your SME letting them know the exams have been assigned and sending the ‘SME Review’ and ‘Subject Matter Expectations’ documents for their review prior to grading
Assign applications to SME (with auto-scored questions)
Assign applications to SME (with auto-scored questions):
**If there are auto-scored questions, follow these steps.**
Start in the Insight side of the system.
- Hover over the Jobs dropdown and select “Recruiting Files”
- In the Exam # column, search for the requisition number
- In the Recruiting File column, click on the name of the job
- On the Recruiting File Detail page, to the right side of the ‘Evaluation Steps’ heading, select “View Applicants by Step”
- Click on the Select Action’ dropdown on the bottom of the page and select “Change Disposition”
- On the Select Candidates dropdown, select “All”
- Click the red “Go” button
- On the Candidate Disposition page, update the ‘Pass/Fail’ step selection to “Passed”
- Ignore the Inactivation Reason dropdown
- Select the checkbox next to “Advance passing candidates automatically”
- Select “Save”
- Select the plus sign icon next to Step 2: Auto Scored
- Your passing and failing applicants should display in the Disposition column
- I usually spot check one or two failing applicants to ensure I can identify an MQ they failed on.
- You can review the applicant responses by clicking on their names OR
- Select “View Recruiting File” above the evaluation steps
- In Step 2, select “View Results”
- This will show a breakdown of candidates passed and candidates failed
- In the Candidates Failed section, go to the Details column and select “View” – this will show you which question was failed
- To return to your Recruiting File, select the “Back” button in your browser
- Select “Auto Scored” in the Evaluation Step column to return to your passing and failing applicants in Evaluation Step 2
- If every candidate fails, or the percentages seem unusual, there is probably an issue with the scoring plan or evaluation steps setup
- I usually spot check one or two failing applicants to ensure I can identify an MQ they failed on.
- In the Select Action dropdown, select “Advance to Next Step”
- In the Select Candidates dropdown, select “Passing”
- Select the red “Go” button
- In Evaluation Step 2: Auto Score, only failing applicants should display
- In the Select Action dropdown, select “Email Notify”
- In the Select Candidates dropdown, select “Failing”
- Select the red “Go” button
- On the Email Notifications page, in the Select Template dropdown, scroll down and select “Statewide Minimum Qualification Notice”
- Select “Generate Notices” – this will generate a preview of your notices
- Select “Send”
- In the “Emails sent successfully” popup box, select ”OK”
- Your passing and failing applicants should display in the Disposition column
- Select the plus sign icon next to evaluation Step 3: Expert Review
- Applicant who passed Evaluation Step 2: Auto Scored should display in the Disposition column
- In the Select Action dropdown, select “SME Review”
- In the Select Candidates dropdown, choose “All”
- Select the red “Go” button
- At the top of the page, in the Assign to SMEs box, select the name of your SME
- If you are using more than one SME assign half of the applicants to one SME and half of the applicants to the other; if you assign all of the applicants to both, NEOGOV will allow both SMEs to grade the exams and average the scores together
- Select “Submit” at the bottom of the page
- The page will refresh and take you back to evaluation Step 2: Auto Scored – a doc should display in the SME column, signifying that applicant has been assigned
- Send an email to your SME letting them know the exams have been assigned and sending the ‘SME Review’ and ‘Subject Matter Expectations’ documents for their review prior to grading
- If there is a SME task on the recruiting file, please mark it as complete.
- Update the status of the recruitment on the recruitment spreadsheet to “assigned to SME.”
Copy a previous job posting
Copy a previous job posting:
- Create a new requisition following the usual process.
- After your requisition is created, return to the Insight side of the system.
- On the Requisitions of your dashboard, find your new requisition and select the “Authorize” (stamp) icon to update the status from “Approved” to “Open”
- On the Requisitions section of your dashboard, create a recruiting file by selecting the “Create Exam” button on the same line as your new requisition.
- If you can’t find the “Create Exam” button for this requisition, you can create a recruiting file by hovering over the Jobs dropdown, selecting “Recruiting Files,” and selecting the “+” icon to create a new one. Be sure the include the requisition number as the “Exam Number.” You can use the ‘NEOOGV Insight – attach a requisition to a recruiting file’ to link your recruiting file and requisition at a later time.
- In Insight, hover over Jobs and select “Postings” to search for the job you want to copy in NEOGOV (if it is not showing up, update the “Current jobs” dropdown to “All jobs” to adjust the filter).
- Under the action column, select the pencil icon to edit the job announcement.
- At the top of the job announcement, select “Copy job posting and scoring plan” to make a duplicate of both the announcement and exam.
- An “Are you sure…” popup box will pop up, so select the blue “OK” button to move forward.
- The page will refresh with the copied job announcement — scroll down and replace the old job number with the number of the new requisition you created for this recruitment.
- I recommend selecting the “Draft” checkbox in the top left corner of your Add/Edit Job Posting page to ensure your posting does not accidentally go live
- For the Recruiting file option selection, choose “Select Existing” and search for the exam number of the recruiting file you created after making the requisition
- Make any updates to your draft job announcement, scroll to the bottom of the page, and select “Save.”
OHC users’ account permissions will only allow them to duplicate postings that are not currently posted. If you are an OHC user and would like to duplicate an announcement that is live, please reach out to DHR. We can duplicate it for you and leave it in “draft” status, so you will be able to make any updates that are needed before publishing.
Purchase advertising to boost a job posting
Purchase advertising to boost a job posting:
In order to advertise job announcements, the job announcement will need to be live on our careers page and assigned to you in the system.
To assign a job to yourself, start in the Insight side of the system:
- Hover over the Jobs dropdown in the top, left-hand side of the screen and select “Postings”
- Click on the job title you would like to advertise
- On the Detailed Job Posting page, select the blue “Edit” button in the top, right-hand side of your screen
- Scroll down to the “Assigned to” field, remove the individual listed there, and search for/select your name
- Scroll down to the bottom of the page and select “Save”
Now that the job posting is currently “assigned” to you, you can boost it (alternatively, as long as whoever is assigned to this posting has access to a purchasing card, they can also follow these same steps):
- On your Insight dashboard, under the “Job Postings” section, look for the job title you would like to advertise
- To the right side of your screen, there is a “Job Advertise” column
- Click the “Advertise Job” link that is on the same line as the position title you would like to advertise
- On the Advertise Job tab, select the site which you would like to pay to boost the job on and select “Proceed to checkout”
- All postings are automatically posted on Government Jobs.
- On the Checkout page, enter in purchasing card information and select “Submit Payment”
[ONLINE HIRING CENTER] Quick Recruitment “How To” References
Print applications with attachments
Print applications with attachments:
Start in the Online Hiring Center (OHC) dashboard.
- Under the My Candidates section on your page, in the Requisition Title section, select the name of the recruitment you would like to print applications from
- Select the checkbox in the top, left-hand corner above the list of applicants to select all applicants, or select the checkbox next to individual applicants you would like to print submissions for
- Using the Actions dropdown midway down the page, select “Print Apps”
- On the Print Applications bar, select “Create PDF with Applications and Attachments”
- In the top, right-hand corner of your screen, select “Continue”
- The print file may take a few moments to generate. You will receive an email when the applications have been combined into one file and are ready to be printed.
- If you did not close out of the “Print Applications” screen in NEOGOV, select the “View, download, or print your applications” link when you receive the email notification your file is ready.
- If you did close out of the “Print Applications” screen, hover over your name in the top, right corner of the screen
- From the dropdown menu, select “Print Applications”
- In the PDF column, select “View” on the same line as the recruitment you would like to review applications for
- Send your combined file to the printer per your usual process
Add a subject matter expert (SME)
Add a Subject Matter Expert (SME):
Start in the Online Hiring Center (OHC) dashboard.
- Under your name in the top, right-hand corner, click on the settings icon (it looks like a gear)
- On the left-hand side of the Settings screen, select “Users”
- Under the Users heading, select the “Add” button
- Complete the required fields on the User Profile Page:
- First Name
- Last Name
- Email (MUST be a state email address)
- Username (we recommend making this the user’s email address so it is easy for them to remember)
- Login time rule: please select default
- Department/Division: enter the agency the SME works at
- Roles: select “SME”
- If you want the SME to be able to see the applicants’ first and last names and review any attachments (resume, cover letter, transcripts, etc.), make sure to also select “View personally identifiable information only for SME reviewers”
- Select “Save”
This created a profile for your new user, but they will not be able to log in until they create a password. You can prompt them to create a password by following these steps:
- From the “Users” screen, you will want to select the search (magnifying glass) icon to the top, right side of your screen
- Search by the new user’s last name
- Select their name
- When their profile pops up, select “send password reset” — this will send them an email that prompts them to create their password
Have new users check their spam folder for emails from NEOGOV – they will probably go there
Add a hiring manager
Add a hiring manager:
Start in the Online Hiring Center (OHC) dashboard.
- Under your name in the top, right-hand corner, click on the settings icon (it looks like a gear)
- On the left hand side of the Settings screen, select “Users”
- Under the Users heading, select the “Add” button
- Complete the required fields on the User Profile Page:
- First Name
- Last Name
- Email (MUST be a state email address)
- Username (we recommend making this the user’s email address so it is easy for them to remember)
- Login time rule: please select default
- Department/Division: enter your agency
- Roles: select “Hiring Manager”
- Select “Save”
This created a profile for your new user, but they will not be able to log in until they create a password. You can prompt them to create a password by following these steps:
- From the “Users” screen, you will want to select the search (magnifying glass) icon to the top, right side of your screen
- Search by the new user’s last name
- Select their name
- When their profile pops up, select “send password reset” — this will send them an email that prompts them to create their password
- Have new users check their spam folder for emails from NEOGOV – they will probably go there
Code candidates on a referred list
Code candidates on a referred list:
Start in the Online Hiring Center (OHC) dashboard.
- Under “My Candidates,” select the name of the position you need to code the list for
- Scroll down and select the checkbox next to the name of the applicant you hired
- Use the “Actions” dropdown to move the hired applicant into a “Hired” status — this will prompt a screen that asks for information such as their acceptance date and start date.
- Keep selecting “Save & Continue to Next Step” until you can select “Save & Submit” (You will
- need to select “Save & Continue to Next Step” two or three times until you have the option to “Save & Submit.”)
- This should push your hire to “Hired – Awaiting Authorization”
- Select the checkboxes next to applicants that were interviewed but not selected
- Use the “Actions” dropdown to move them into a “Rejected” status
- The Inactivation reason will typically be: Interviewed not selected
- Select “Save”
- Select the checkboxes next to applicants that were not interviewed
- Use the “Actions” dropdowns to move all of the candidates who were not interviewed or selected from referred into a “Reject” status
- The inactivation reason will typically be: Considered not interviewed
- Select “Save”
Coding the referred list can be completed by HR staff with NEOGOV access or anyone who is listed as a hiring manager on the requisition.